%2520(1).avif)
The traditional way of implementing dark mode in Bubble apps using conditional expressions is simple but has many downsides. This article will show how to implement a flexible and scalable mechanism for users to change the layout colors without plugins.
Traditional Method of Implementing Dark Mode in Bubble
You can find many guides online on "how to add dark mode to Bubble apps." Most rely on the simple concept of adding conditional expressions to each element separately.
This approach is easy to implement but has several downsides that become apparent during app development.
Need to Edit Individual Elements
You must add a conditional expression to change the color of an element based on user preferences for every single object in the app. This means dozens of additional hours for complex projects spent just on adding colors to the layout.
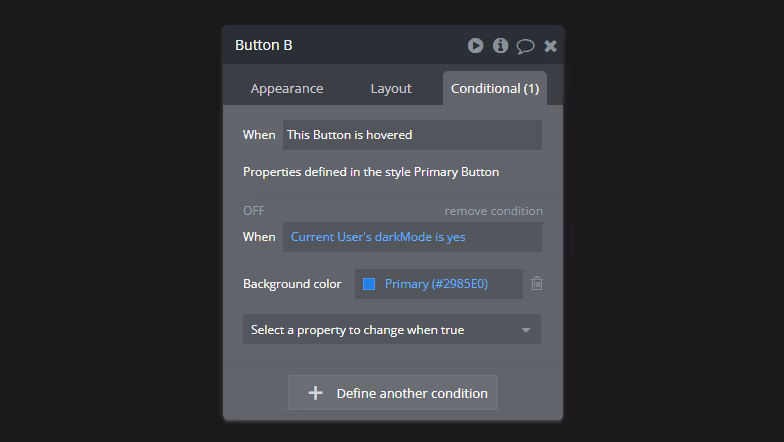
Although some conditional expressions can be implemented in global styles, the editor only allows the simplest conditions. For example, checking if the 'darkMode' field is 'yes' is possible, but conditioning based on 'Display' values from an 'Option Set' is not.

Visible Delay in Rendering Changed Colors
Conditional expressions on elements are triggered quite late during the app's code loading. With many operations happening earlier (e.g., during the 'Page is loaded' event), there will be a noticeable moment when the color of an element changes from the default to the conditional expression's specified color.
Limited Number of Color Variables Available
If you use advanced design systems (like Material), the limit of 32 color variables will be too small to handle the primary color palette, not to mention an additional dark mode. As a result, you will end up using literals, which are hard-coded color values. This approach is prone to errors and typos, needs to be more scalable, and unnecessarily increases the code volume of the app.
Dark Mode and Additional Color Palettes in Bubble Apps
The target group for one of the apps I built includes professional developers. I wanted the user experience to be as close as possible to the UX/UI patterns known from the most popular programming tools, with one of the features being the ability for users to choose the interface's color palette.
If I use the traditional approach described above, adding a new color scheme to the app would require me to add new conditional expressions to each object separately. Instead of the traditional approach, I used a simple trick – dynamically changing the color variable values (CSS custom properties/color variables) based on user preferences.
This method has several advantages:
- Add Any Number of Color Palettes: You can add any color palettes to the app and store them as an Option Set. The only limitation is that the number of color tokens in each palette cannot exceed 32, which is the number of variables available in the Bubble editor.
- Easy Addition of New Color Palettes: To add a new color palette, you don't need to make any changes to the existing layout. Add a new option to the Option Set, and the HTML element will change the color variables based on the user's current selection.
- Colors Updated Early in the App Loading Process: If the HTML element responsible for overriding the color variables is placed at the top of each page, colors are updated very early in the app loading process, preventing the "flash" of default colors.
- Add Dark Mode to Any Existing and Extensively Developed App: The only condition is that all elements must be styled using Bubble's native color variables.
- BONUS: No need to use plugins or custom JS code to avoid slowing down your app.
Implementing Dark Mode with User-Selectable Color Palettes
Implementing dark mode in Bubble apps using the earlier method consists of several steps.
Step 1: Create a Set of Color Variables and Assign Default Values
In the Styles > Style variables tab, create a set of variables and assign them colors from your primary palette. You can choose any colors at this stage (since they will be overwritten later). Still, the default colors will be visible in the editor, so it's worth assigning them values that reflect reality for your convenience.

Step 2: Create an Option Set to Store Color Values for Each Palette
Create a new set of options in the Data > Option Sets panel - name it ‘colorScheme’, ‘colorPalette’, or something similar. Each option in the set should consist of a list of Text type attributes with names corresponding to the variables introduced earlier. Matching names is not a requirement but significantly facilitates the work. The values of individual attributes are the color codes appropriate for each palette.
Example from my app:
Step 3: Build a Mechanism for the User to Choose the Color Scheme
First, in the Data Type 'User', create a field where you will store the color palette the user selects. In my case, it is a field named 'colorPalette' of type 'OS_colorPalette' with the default value set to 'Default dark'.
Then, in your app, build a mechanism for the user to select and save the chosen palette. In an earlier video, my solution was shown – a simple dropdown that, as 'Data source', fetched the list of all options from 'OS_colorPalette'.
Step 4: Retrieve System Names of Used Color Variables
Launch the main page of your app (index) in a browser, then open the DevTools extension. In the Elements panel, highlight the main <html> tag. In the Styles panel, please find the list of all color variables (likely saved in the b-root class), then copy and paste it into any text editor.

Format the copied list so it becomes a correct 'style' tag:
- Wrap the list with <style> tags.
- Assign definitions to the 'root' pseudo-class.
- Remove duplicates (entries with the _rgb suffix).
- Based on the assigned RGB values, identify which automatically created Bubble variable name corresponds to your variable names. For convenience, add appropriate comments.
- Remove color values for each variable and add the '!important' property to all items.
Below is a formatted list of color variables from my app:
Step 5: Add a Dynamic Stylesheet to the Bubble App
Add a new HTML element to every page of your app. The object should be placed first on the page so the color swap occurs before the other elements are displayed.
In my app, I solved this with a reusable element positioned first in the elements tree on each subpage. Inside it, there's an HTML element sized 1x1 px.
Paste the list developed in the previous point into the content field of this element. Fill each declaration with a dynamic expression referring to the color stored in the Option Set under the parameter corresponding to the given variable.
Example from my app:
In the created HTML element, the default color variable values are overwritten with those stored in the database of the logged-in user. As soon as the component is fully loaded, a query to the database is executed, which returns the palette of colors selected by the user and all its values. Subsequent elements on the page are already rendered using the overwritten colors.
Finally, the edited element is worth checking the 'Wait to render this element until it is visible' checkbox – this should prevent overwriting variables with empty values if the database reference takes longer than usual.
Dark mode and color palette based on browser settings
There's a more straightforward way to implement the method mentioned above, where the user doesn't choose the color palette, but it's set based on the browser settings.
The procedure is similar to the one described earlier:
- You repeat the first step, setting up a list of color variables for your app and assigning them any default colors.
- You skip the second and third steps, which involve storing user preferences in the database. The layout's color scheme depends on the browser settings, so there's no need to save this information in the database. The app will read it each time a page loads.
- You repeat the fourth step, meaning you copy and format the list of variables. However, the code overriding the color variables will be slightly different. It uses a native CSS function that recognizes the current user's browser settings, including those not logged in.
Example code::
In the end, you repeat the fifth step, which means you paste the prepared CSS code into the HTML element rendered on every app subpage.
Dark Mode in Bubble – Summary
Overriding color variable values is a much better way to implement dark mode in Bubble apps than the traditional approach based on conditional expressions. It allows adding a user-friendly function to change the app's color scheme with relatively low programming effort, regardless of the project's complexity.


.png)